
Cradle/Crib Cake Tutorial!
Hiya everyone!
As you may have noticed, we're slowly transferring some of our old blog posts with some helpful information in them over from our old Mcgreevy Cakes blog to our new Cakeheads blog, and thought it might be helpful to let you know when we do that as we sometimes add some new information to the old stuff!
I've added a template to the photo section and some written information to the instructions section of this free, antique-inspired cradle cake tutorial that I made years ago, originally for my YouTube channel, to help answer some questions I've gotten on this one over the years.
And we also just wanted to let you know that we have a ton of free tutorials alongside of our Cakeheads member tutorials in our new cake project center here on the Cakeheads website, so be sure to check it out from time to time even if you're not a Cakeheads member as we add new, free tutorials to it monthly!
I've also included the updated info for you on the free cradle tutorial here, in case anyone is interested in trying out this fun project!
And you can click on the tutorial project link at the bottom of this page to find the template I've added and to see the original video showing how this one was made.
I'd love to see your project if you ever end up trying this one out! Always feel free to leave a comment or ask a question in the "comments" section of the tutorial page...and you can even upload photos of your work there so I can see them!
Wishing you all a great start to a brand new year! Xx
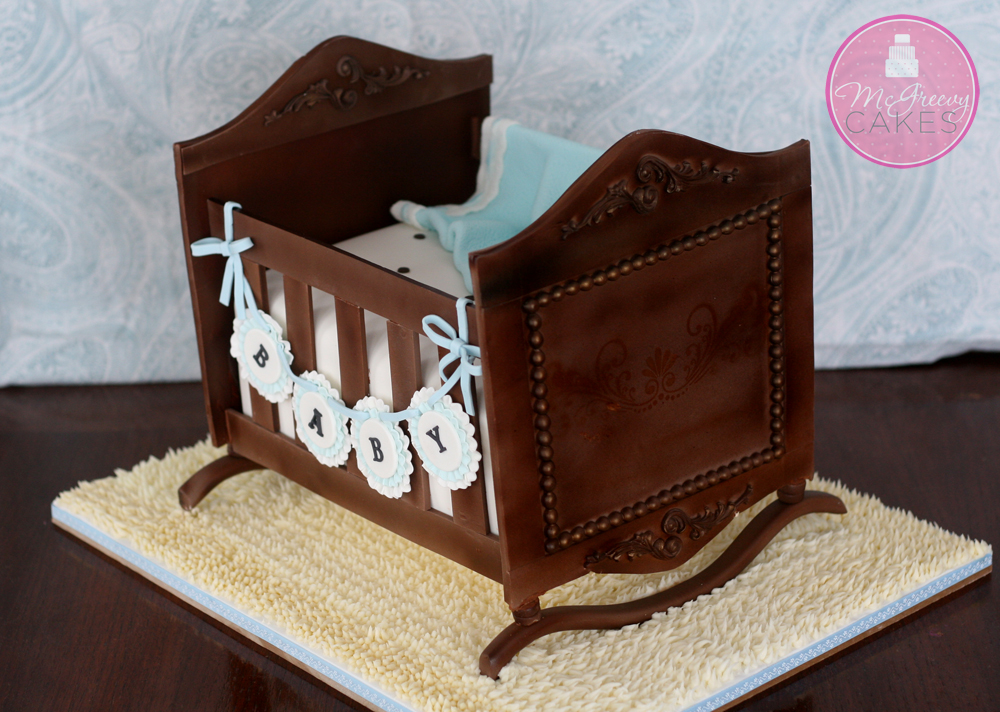
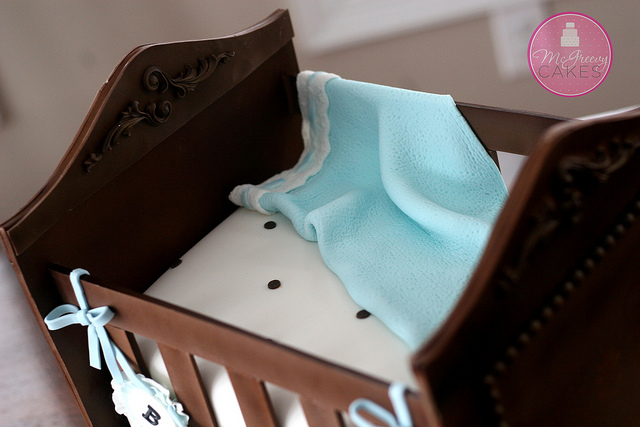
For the rockers, I rolled out two long longs of the 50/50 mixture and used a fondant smoother to flatten then just a tad rather than keep them rounded. Then I let them dry in the shape you see them, only on their side on a board. I also made four little “legs” coming off the corners of the crib to the length they needed to be in order for the rockers to attach to them but still be touching the board as well.
If I did it again though, I wouldn’t use the 50/50 mixture… I would use straight pastillage if I wanted to keep them the exact same shape and size, ’cause they can break easily as the weight of the ends of them want to pull down and break the whole piece in half.
If making these same rockers, you’ll have to be very careful and quickly attach them to the little legs coming down from the corners of the cradle (which should already be attached to the crib ahead of time) in order to keep the rockers from breaking.
Or you can use the template I included in the post for different set of rockers that would be less likely to break, and with those I would use straight pastillage as well.
Either way, Let them dry for a few days before adhering to the cake and use melted candy melts to attach all together.
Cut out the templates and use them to create your headboard, footboard, trim pieces for both and your bottom rockers.
Cut out all of your pieces a few days ahead of time.
I used a 50/50 mixture of modeling chocolate and gumpaste, but you could use straight gumpaste or straight modeling chocolate or even fondant with a generous amount of tylose mixed in.
For the side bars, add about 2 extra inches to the length of your cake (11″+2″=13″ in my case) and use that as the measurement of how long to make yours. That way you’ll have extra length so you can cut them down to the perfect length when putting it together in the end.
Make them each wide.
Make four side bars, two for each side.
When cutting the slats, make them longer than you think you’ll need as well, so when you’re ready to attach them to the cake, you can hold them up to it and decide what the perfect height is for them and cut them down accordingly.
Make the slats about 3/4″ wide or less if you’d like, and cut as many as you think you’ll need to fit on each side of the cake. I left about a 3/4″ gap between each slat when attaching and decided how many to use based on that.
I ended up using 5 slats on each side of my cake.
Here’s a link to the First Impressions scroll mold I used on the headboard: https://amzn.to/2Hm0PON
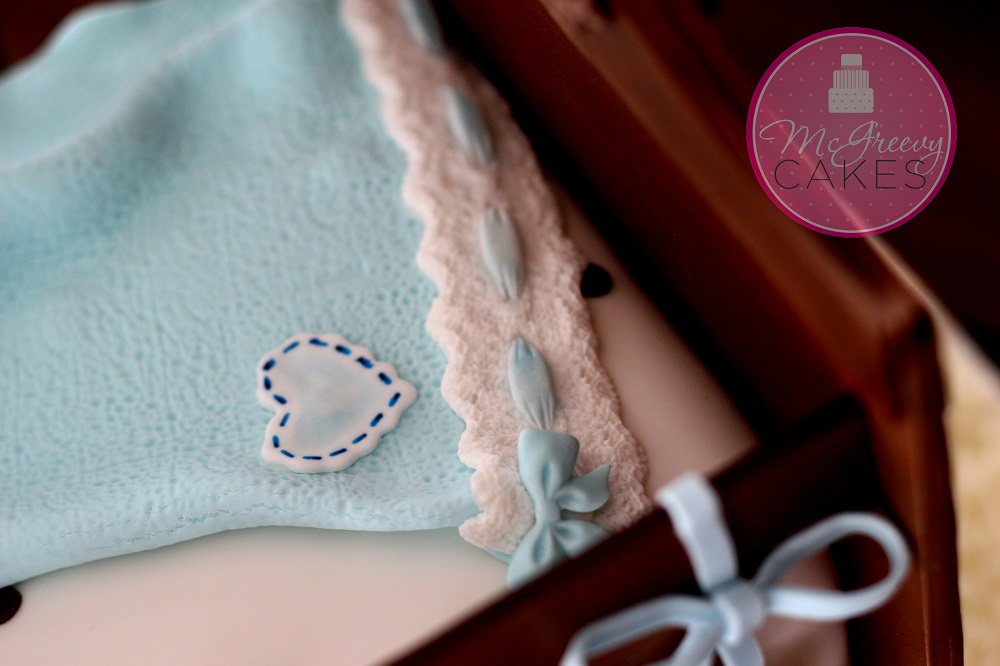
Here’s a link to the Karen Davies Elizabeth Lace Mold I used on the edge of the blanket: https://amzn.to/2JxGjvw
And I used the “sand” texture sheet from this Makins Texture Sheet pack to create the texture on the blanket: https://amzn.to/2HkK3Q7

More Articles For You

Shawna McGreevy
I love that our Cakeheads members enjoy hanging out together online, learning from and sharing with one another each day.
Being a part of this group is truly one of the most amazing and enjoyable ways to learn the art of cake decoration!
Come join the Cakeheads family...we'd be honored to have you with us. Xx
Shawna has been featured in several different magazines such as Cake Masters and American Cake Decorating Magazine and has been a featured artist at the Cake, Bake and Sweets Show, Australia and the Cake Fair in Florida. She’s also taught cake classes around the world, was nominated for the Cake Masters Cake Hero award and has been chosen as one of the top ten cake artists in the United States, 2017 by Cake Masters Magazine.


Top Ten Cake Artist, USA - 2017